If you’re still getting used to Gmail, don’t feel bad. So am I. It’s a great tool, but many of the functions it offers are less intuitive than one could hope. For example, setting up “Groups.”
Part of the difficulty is that “groups” can mean different things within the realm of Google. In this case, let’s talk about grouping your contacts so you can quickly send an email to a specific set of people.
Gmail automatically collects all the email addresses you send to and receive from, but it's up to you to add them to your “My Contacts” list. With a particular email open, look around for a "More" drop down menu and the option to "Add to My Contacts." One place you can find that is by rolling over the email address displayed at the top of the open email. That brings up the Chat window, which has that More button at the bottom. It's a bit of a bother, but worth taking the time to do.
You also can add new contacts by typing in the information, and you can enter additional information for any contact, but that’s not necessary to set up groups of email addresses. The thing that is necessary, however, is that you set up the group or groups you want to use.
Like most Google things, it’s easy, but it helps to know how to proceed. Let’s assume you want to set up a group and call it “Other.”
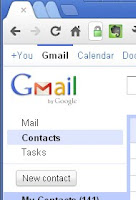
Begin by selecting Contacts from the three main options (Mail – Contacts – Tasks). If you’re still using the old look (shown on left), that’s in the upper left corner of the window, directly under the Gmail logo.
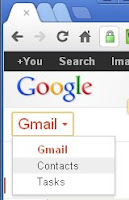
In the new look (right) you’ll need to go to the pull down menu associated with Gmail.
Next create a new group called Other by clicking on New Group from the list on the left side of the screen.
Once the group is created, simply go down your list of contacts and check all those that you want to be labeled as part of Other. Then click on the Groups button, which only appears if you have one or more contacts checked. In the old look it says Groups; in the new look it’s just a set of three heads. Select Other from the drop down menu, and click Apply.
The nice thing is that you don't have to pick just one group for a person to belong to. Each contact can be labeled as being in a bunch of different groups.
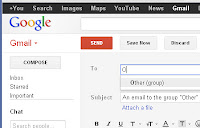
Once a group is set up, it’s easy to send an email to the whole group. Just select Mail (or Gmail in the new look), then Compose mail (or Compose in the new look). Start typing the group name in the “To” field, select the suggested group, and it will automatically insert everyone's email addresses.
One note of caution – make sure all the contacts you put into the group actually have email addresses as part of their information or they won’t get the email.As it says on the big red Staples button, that was easy.
No comments:
Post a Comment